
Sitemap Generator - DYNO Mapper User Guide - Page 2
Upgrade / Downgrade September 27, 2015 by Super User
Upgrade / Downgrade
In the top right corner, Click the My account in the user menu. Click “Upgrade/Downgrade Plan”. Select the new plan of your choosing.
Read moreHow to Cancel? September 27, 2015 by Super User
How to Cancel?
In the top right corner, Click the My account in the user menu. Click “Update Subscription”. If you wish to terminate your account, just click the link below. Cancel Account and Subscription
Read more
Create Visual Sitemaps September 16, 2015 by Super User
How to Create Visual Sitemaps
Option 1: Create from URL
Enter the base URL that you would like to create a visual sitemap for including the http:// or https:// located at the beginning of the url.

Option 2: Create from XML
Create visual sitemaps from xml files that are located on your computer or online via a url.
Option 3:Create from Scratch
Create visual sitemaps using the DYNO Mapper editor to manually add, remove, edit, and set categories of pages without the need to crawl urls or import xmls.
Option 4: Create from Existing
Create visual sitemaps from sitemaps previously created within your DYNO Mapper account.
Advanced Options

Follow robots.txt - The robots.txt file allows websites to indicate to web robots like Google robot and DYNO Mapper that you would like them to ignore certain pages. The preference in DYNO Mapper is on by default and can be switched off in the Create from URL advanced options. The robots.txt file name must be written in lowercase and placed in the root directory of your website and follow The Robots Exclusion Protocol - link to http://www.robotstxt.org/robotstxt.html
Follow subdomains - A sub-domain is a domain that is part of a larger domain. For example, north.example.com and south.example.com are subdomains of the example.com domain.
Ignore trailing slash - If website code is hand written, it may not be consistent and also contain certain problems even though the page will still appear to work properly in a web browser. This option will allow the DYNO Mapper to be more forgiving and overlook problems like a web browser does if on is selected or be less forgiving if no is selected.
Ignore query string - A querystring is info within a url that follows a '?' - for example www.example.com/index.html?thisis=thequerystring. The option is important if you have dynamic sections within your website like calendars. Dynamic sections within a website that use query strings can consist of many pages that you might want to omit from your sitemap.
Unique page title - If your website contains pages that each have a unique title, selecting yes for this option will give you a very accurate crawl. Some content management systems can refer to the same page by quite a few different urls which causes duplicates within your visual sitemap.
Ignore scheme - Some websites have duplicate pages prepresented because they allow multiple schemes of an individual page. For example, if you do not ignore scheme of www.example.com - the pages http://www.example.com & https://www.example.com would be considered two different pages.
Arrange links by URL - If you would like DYNO Mapper to arrange your sitemap based on the parent/child relationship used in the url, keep the option on.
Domain as root - If you are crawling a sub-domian, this setting lets you set that sub-domain as the root of the sitemap tree.
Include Redirects - A URL Redirect, also called URL Forwarding, is a technique for making a web page available under more than one URL address. When a web browser attempts to open a redirected website URL, a page opens with a different URL. Use this feature to display all redirects in the sitemap visually.
Include Bad Links - A bad link is a 4xx error where the intended page that you opened in your browser does not work. Use this feature to display all of your bad links in the sitemap visually.
Include PDFs - Use this feature to display domain level PDFs in the sitemap visually.
Sart URL as Root - When crawling a subsection of a website, you will want to use this feature to set the Root of the sitemap to the starting URL. If this setting is OFF, the domain’s home page will be used as the root by default.
Website Authentication - Use website authentication if you would like to include private front end pages within your sitemap from popular CMS systems. If your favorite CMS system is not in the list, please send us an email to inquire if we can add it CMS systems that we support.
Basic Authentication - Use HTTP Basic authentication for authentication that is static, standard HTTP headers.
Website Authentication
If you need to include private sections of a website which require a login, you will want to use website authentication which gives the software the ability and access to add these private pages to your sitemap.
Supported CMS Systems
We have authentication plugins for Wordpress, Joomla, Drupal, and Expression Engine that enables a quick and easy way to authenticate.
- Select CMS in System Dropdown
- Add Username Password, Password, and Login URL
- Click Start Crawling
Web authentication is not necessary if you don’t have private pages to crawl.
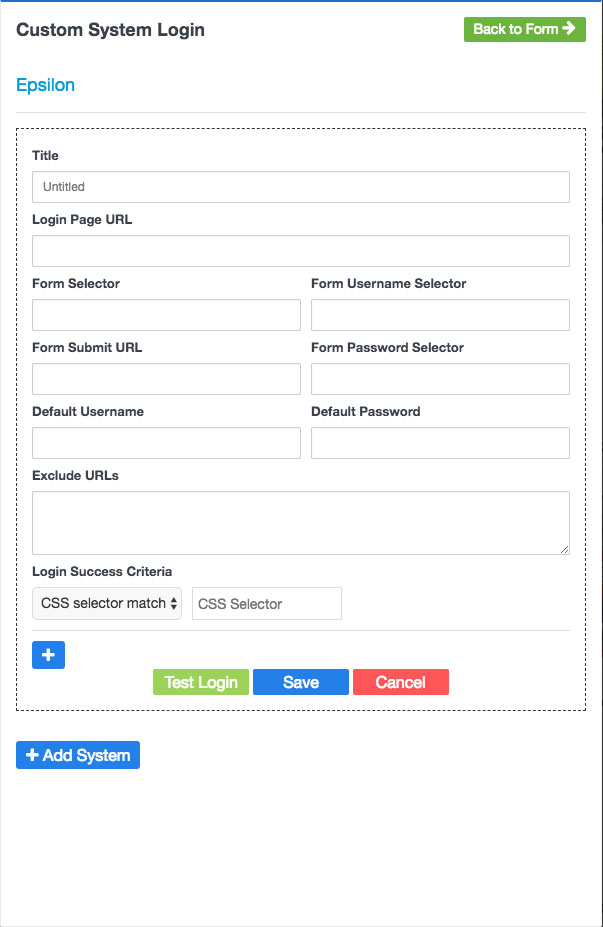
Custom System Login
If you are using a CMS system not listed above or if your website or application’s CMS is custom, you can authenticate using the Custom System Login feature to crawl private pages.
When crawling a password-protected website, there are some practices you should follow.
- Use a read-only account when crawling - When you’re crawling through your protected site, you’re going to be picking up on things that need to be changed. You may even be tempted to fix them yourself as you go along, but you have to remember the reasons for your crawling the website in the first place. One of them is to make a list for the developers to sort out. After all, they’re the professionals, and you’ve hired them to deal with these kinds of issues. If you lack the expertise, you may end up doing more harm than good. By using a full administrative username and password when crawling your website, you’re also giving the crawler full access to the entire admin section. While the best crawlers won’t do anything of the like, with full administrative access, you risk having your crawler making changes to the site’s themes and plugins, even deleting posts. This is why it is imperative that you setup a read-only account for crawling your website.
- Always exclude your admin pagesg - This carries on from what we’ve said in the above point: the read-only account you’ve set up for crawling your website must exclude the administrative back-end pages and folders to help you avoid making those undesirable changes to your website. For WordPress, you’ll want to exclude the entire /wp-admin/ section; for Joomla, the same applies for the /administrator/ section.
Create a Custom System Login
- Click Create from URL
- Click Show advanced options
- Click Add/Edit custom system
- Add Custom System Login form details
- Test Login
- Save
- Click the Back to Form Button
- Add the URL of the website or applications
- In Website Authentication, select the new system that you created in Select System. Username, Password, Login URL do not need to be entered again if you added them as the default in the new system. If you are using a different user account than the one created with the plugin, you can enter these detail in the fields for Username, Password, and Login URL.
- Click Start Crawling
Other Options
Maximum Pages. Enter a number to limit the number of pages crawled before stopping the crawler. This is not exact because some pages might not be included in the sitemap by default or certain pages are identified as duplicates of one another.
Maximum Depth. Enter a number to limit the number of levels crawled.
Crawling Subdirectories
Option 1: Only Subdirectory
You can crawl a sub-directory of a website using the Only Subdirectory feature in the advanced options under Other Options / Filter Links. Use a working starting URL that points to the subdirectory landing page and don't forget to turn Start URL as root to ON. Enter the subdirectory only, ex. /subdirectory/.
* You must have an active subscription to use this feature.
1. URL: https://www.example.com/subdirectory
2. Start URL as root: ON
3. Filter Links - Only Subdirectory: /subdirectory/ then click enter.
4. Start Crawling
Option 2: Include
You can filter a website crawl using the Include feature in the advanced options under Other Options / Include Links. Use a working starting URL that points to the subdirectory landing page and don't forget to turn Start URL as root to ON. Enter the subdirectory only, ex. /subdirectory/. This method will crawl the entire website before filtering your directories.
1. URL: https://www.example.com/subdirectory
2. Start URL as root: ON
3. Under Include, click Add/Edit Links
4. Add the starting URL, Ex. /subdirectory/
5. Select your match type, use Regex
6. Click Enter
7. Start Crawl
Restricting Subdirectories
Option 1: Skip Links
Use the Skip links feature to skip pages during your website crawl that match a certain format. This feature is great for removing unnecessary pages from your sitemap build and content inventory. Skip links is a pre-crawl function.
1. Show advanced options
2. In Other Options, in the Skip Links row - click Add/Edit Links
3. Enter a part of the url
4. Select a matching rule
5. Press Enter/Return
6. Repeat if you have other URLs that you would like to skip
You can copy and paste line statements if you click the Switch to Text Editor.
Option 2: Exclude
The Exclude function is a post-crawl function and will restrict the crawler from including certain directories. Use the Exclude links feature to only exclude pages that match a certain format after the crawl has completed. This is a very accurate method of exclusion because the entire website is crawled before pages are excluded.
1. Show advanced options
2. In Other Options, in the Exclude Links row - click Add/Edit Links
3. Enter a part of the url
4. Select a matching rule
5. Press Enter/Return
6. Repeat if you have other URLs that you would like to exclude
Edit Sitemaps September 16, 2015 by Super User
Edit Sitemaps
After you have created a sitemap, click the edit button located under the title of your sitemap in the list. Another edit button is located for your convenience in the upper right hand corner of your sitemap. Only logged in users will be able to see the edit button located on your sitemap. Shared viewers of the sitemap will not be able to see or use the edit button.
Grid View

List View

Edit your sitemap using the tools located on the left side of the editor. Drag and drop pages to position the hierarchy.
Editor Tools:
 Add Page
 Assign Category
 Assign Workflow
 Assign Tag
 Delete Page
 Preview Sitemap

Read more
Website Accessibility Testing September 16, 2015 by Super User
Website Accessibility Testing
You can test any website that you have crawled using the Create from URL option in the sitemaps menu.
After you have created a sitemap, Click Accessibility

In the dropdown located under Accessibility. Select the website that you would to run an accessibility test on.

Click Run a Test after you have selected your website from the dropdown menu.

Choose one or multiple Guidelines to test your website against.

Choose from the following Accessibility Guidelines:
● BITV 1.0 (Level 2)
● Section 508
● Stanca Act
● WCAG 1.0 (Level A)
● WCAG 1.0 (Level AA)
● WCAG 1.0 (Level AAA)
● WCAG 2.0 (Level A)
● WCAG 2.0 (Level AA)
● WCAG 2.0 (Level AAA)
● WCAG 2.1 (Level A)
● WCAG 2.1 (Level AA)
● WCAG 2.1 (Level AAA)
Then click Run
Your accessibility test will be available to view within a few minutes. The results of your accessibility test can be viewed by clicking the Test Title.

Status
This column displays the pass or fail grade of a particular page. You will see a green checkmark if your page is accessible, a red X tells you that your page did not pass the accessibility test.
Known problems
The number of accessibility issues that have been identified with certainty as accessibility barriers. You must modify your page to fix these problems, then retest.
Likely problems
The number of issues that have been identified as probable barriers, but require a human to make a decision. You will likely need to modify your page to fix these problems;
Potential problem
The problems that DYNO Mapper cannot identify and require a human decision. You may have to modify your page for these issues, but in many cases you will just need to confirm that the problem described is not present and harming usability.
Click Review or the number to see the Accessibility Review page that displays detail for the known problems, likely problems, and potential problems.

This pop-up displays the details of the problems that were found. The description of the problem, the code where the problem appears, and a suggestion of how to repair the problem identified provides you everything you need to fix the accessibility problem. You can export individual page reports by clicking CSV or PDF in the Accessibility Review pop-up or you can export a site wide report by clicking the Export Button on the Accessibility page.
Read more
Create Visual Sitemaps
Create, edit, customize, and share visual sitemaps integrated with Google Analytics for easy discovery, planning, and collaboration.
Popular Tags
Search Engine Optimization SEO Accessibility Testing Create Sitemaps Sitemaps UX User Experience Sitemap Generator Content Audit Visual Sitemap Generator
Get Started with DYNO Mapper
Join thousands of professionals using the most advanced visual sitemap tool to simplify discovery, IA, and content planning.
👉 Start Your Free Trial — No credit card required.